Simulating an inverter is very straight forward process. The only thing we need to do is start Verilog-XL simulator and specify a simulation file. If we want to simulate bigger circuits (for example a train of inverters), we need first to create a schematic consisted of basic cells whose behavioral model is already specified. In our case of a train of five inverter, create a new schematic and connect the five inverters and specify the input, output, Vdd and Vss pins. Then run Verilog-XL on this schematic. Verilog will follow the hierarchy of the circuit and it will create the necessary net list for the Verilog simulation.
Running a Verilog Simulation
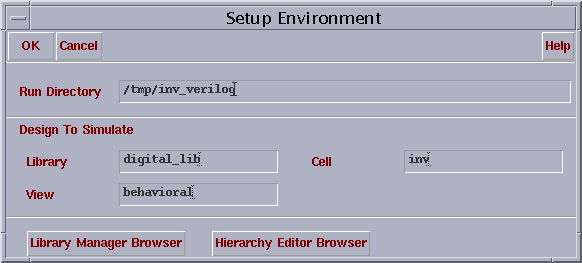
Left click CIW:Tools->Verilog Integration->Verilog-XL. The Setup
Environment windows should appear. Fill in the appropriate fields as
shown in the figure. It is recommended that you run your simulation in
the local /tmp directory on the machine; your simulation will run
much faster, as this reduces the need to communicate back and forth with the server during simulation. If
you run into problems finding the /tmp directory, keep in mind that
it is an absolute path, not relative to your current directory.
Left Click OK. The Verilog-XL Integration Control window should appear. There are (for us) three very important buttons on the control panel. The two that are currently active (not greyed out) are Start Interactive in the upper left corner of the panel, and the View Waveforms button in the lower right corner of the panel. The third is the Continue button (currently greyed out) - the second button in the second row of the panel. Left click Verilog-XL: Stimulus -> Verilog
A warning box should appear, left click Yes. You want to create a new stimulus file for the Verilog simulation. Select the Edit Mode button and select the testfixture.verilog This window should look like the one on the next page. You can specify a different name for the stimulus file, but this requires manipulation with the copy option in the window below. This is left to the reader as an exercise.
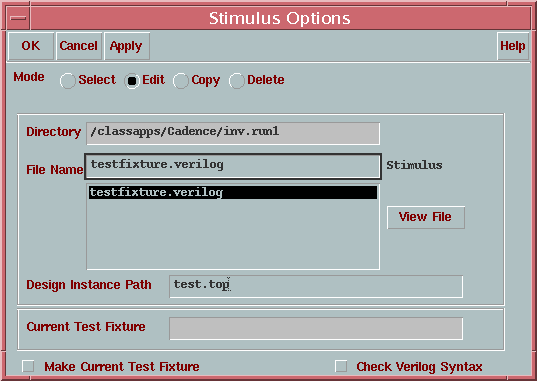
Left Click OK and a new text tool should appear. In the text tool you are going to write the stimulus file.
Note: If you are having difficulties starting a text tool, you can go to the directory where your Verilog simulation is specified and use vi or emac to edit the stimuli file.
As in the behavioral model, anything following a "//" is considered to be a comment. After the comment lines, make the file look like this:
initial
begin

    io_vdd = 1'bz;
    io_vss = 1'bz;
    io_in  = 1'b0;
    io_out = 1'bz;

    #5 io_in=1'b1;
    #5 io_in=1'b0;
    #5 io_in=1'b1;
    #20 $finish;

end
The program above use the following commands:
initial- starts initialization of the simulation.begin- marks the beginning of the simulation file. Between begin and end is where the test pattern(s) should be written.io_in = 1'b0- this says that the input pin shall have an initial value of 0. The b means that it is a binary input (binary 0 = OV, binary 1 = 5V). The 1’ tells the simulation engine that it is a single bit input (4’ would signify 4 bits).#5- represents 5 nanoseconds (in our case ). The # can be defined as another time unit elsewhere.#5 io_in = 1'b1- This tells the simulation engine that 5ns after the last event, that this event should take place (the io_in pin changes to a binary 1).$finish- Tells the simulation engine that there is nothing more to run.end- signifies the end of the simulation test fixture.
Now save the file and close it. You should see again your Stimulus Option window. Now click on the Select button in the upper corner. Select the testfixture.verilog file. Left click on the OK button and you are ready to run the simulation.
To start the simulation, left click Verilog-XL: Simulation->Start Interactive
The Verilog-XL is going to create a net list for your file. If it prompts you to renetlist the design, answer No. When the net list is created the simulator stops and waits for further instructions from the user. At this point you can use different debugging tool for your program. You can set breaks, watches, step through and others. In our case, we want to run the whole stimulus file. Go to Verilog-XL: Simulation->Continue. After the process is complete go to VERILOG-XL: DEBUGING->Utilities->View Waveform.
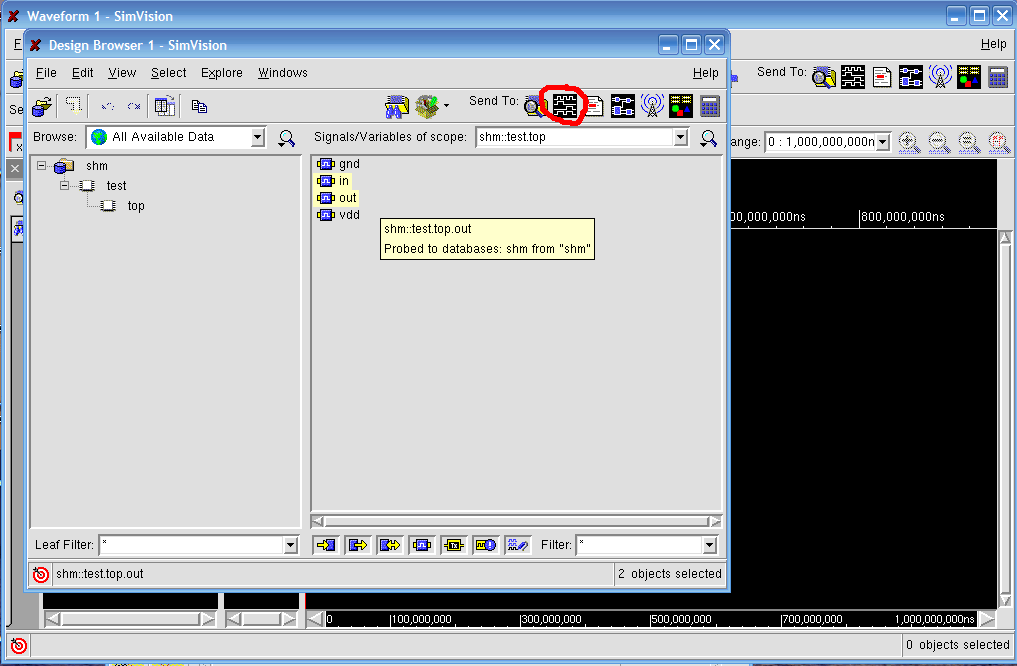
Shortly you should see the Simvison waveform viewer. Go to File->Open Database and find the directory for your verilog run. Inside you should find a subdirectory called RunObject.0. Keep on descending into subdirectories (there should only be one in each) until you find shm.trn. Select it and hit Open.
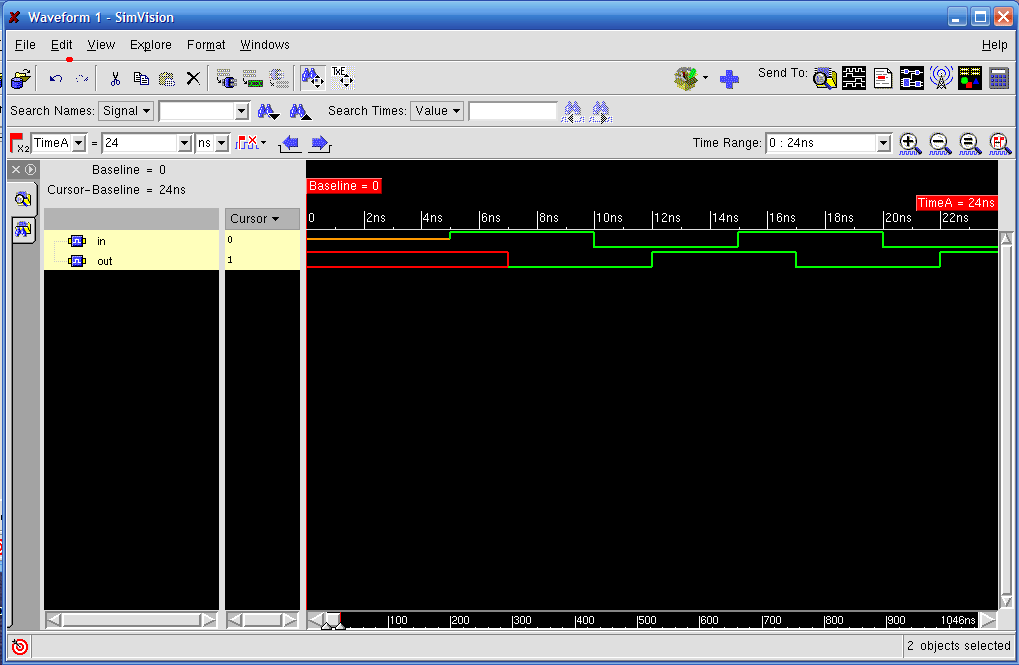
In the browser window that tops up, open up the tree on the left hand side that says shm. Inside there should be a list of signals. Select in and out, and hit the button Send to Waveform. Its on the top right hand side - a black square with pictures of digital waveforms.
Now the waveforms should show up in the main window.